Riprap is chunk rock, often granite or broken concrete block, that’s been placed by construction workers or property owners to prevent erosion. Dams and bridges are common places to find riprap, but you’ll often see it along homeowners’ shorelines, marinas and other places. Ultimately, riprap is where you find it, and many waters have it in abundance.
What makes it special? Three things. First, it’s usually different than the substrate around it, and we know how much bass like “different.” Second, it’s generally placed along steeper shorelines that have about a 45-degree angle from the waterline down to the depth where the riprap stops and the bottom flattens out. Finally, riprap fosters the entire food chain. Shortly after the rocks get wet, algae forms, and algae is food for baitfish, crawfish, immature insects and other morsels you’d find on a bass buffet.
Riprap holds bass all year long if there’s sufficient depth nearby. Therefore, there’s no “wrong” time to fish riprap, but there’s likely no better time to focus on it than the spring. This is the time when bass are preparing to spawn, but if they’ve already spawned on your waters, you can usually find bass recovering from that taxing experience by either grabbing an easy meal off the riprap or guarding fry there. And when the bass in your local waters are spawning, you’re almost certain to find some of them nesting on riprap in an area tucked away from wind, waves and boat activity. Riprap is that versatile.
Of course, the best places to find pre-spawn bass on riprap are near the areas the fish will be spawning—shallow flats in protected bays. If you can find a bridge with riprap nearby, you’ll certainly locate some bass. They likely wintered in the depths of the channel the bridge traverses, moving up and down the pilings as conditions changed or their food source moved. Once the water began to warm, they moved up to the riprap adjacent to the bridge, looking for crayfish that were coming out of hibernation or feeding on baitfish that moved through the funnel created by the bridge’s riprap walls.
As the water continues to warm, bass will move farther up and along the riprap, still targeting crawdads and baitfish and becoming vulnerable to a variety of bass tactics.
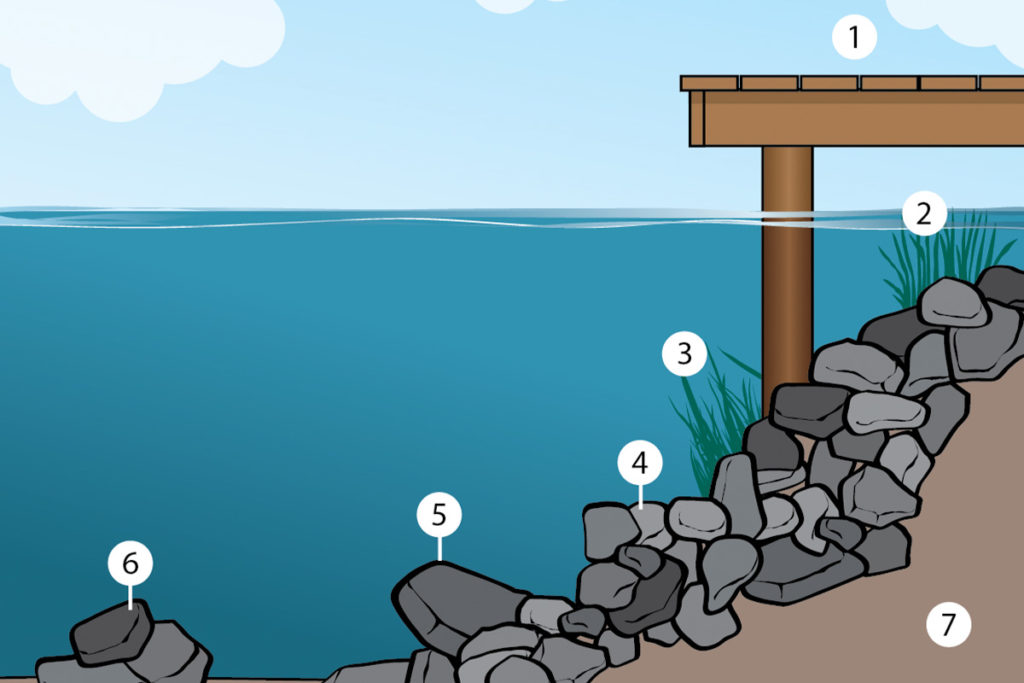
RIprap offers anglers a target-rich environment. Dissect it carefully, zeroing in on both traditional and often-overlooked areas.
Typical Target Areas
Docks adjacent to or in riprap
Emergent weeds under docks
Subaquatic weeds
Ledges
Large rocks amongst riprapv
Rockpiles away from riprap
Transition areas; riprap intersecting banks
Seawalls adjacent to riprap
Outcroppings in riprap
Boat ramps intersecting riprap
Current flows adjacent to riprap
Most of the baits in your tackle box will catch riprap bass at one time or another, but four types really stand out: jerkbaits, crankbaits, spinnerbaits and jigs. You’d be wise to have more than one of these bait types tied on whenever you’re fishing riprap.
Suspending jerkbaits are a great choice when the water temperature is below 60 degrees and clear (at least 2 feet of visibility). The ubiquitous jerk-jerk-pause retrieve is just fine, and you should select your jerkbait by determining the depth you want to fish. Shallow, short-lipped models are great when you’re plying the rocks closest to the bank, but deeper models can get you down to 8 or 9 feet, which is typically a boat length or more off the bank.
Jerkbaits are a cold-weather staple because they stop dead in the water on the pause, giving lethargic bass every chance to catch and eat them. Since these are baitfish imitators, stick with colors that approximate your local forage. If the water’s a little dingy, opt for a subtle attractor pattern like clown.
Crankbaits are a riprap standard, too, and no other lure type combines the crankbait’s ability to contact the rocks and avoid hang-ups quite so well. For riprap, you can trim your crankbait selection to two types: square bills and deep divers. Square bills are the tool for covering the shallows down to 4 or 5 feet. The bill shape helps them deflect off the rocks and keeps them from getting stuck less often than other styles.
If you need to go deeper, select something that can reach 12 feet or more. A true deep diver will keep you in near-constant contact with the rocks, which is what you want. All that knocking can trigger a feeding response in nearby bass. Colors should vary from baitfish to crawfish patterns. Since crankbaits create a lot of noise and disturbance, they’re a solid choice in dirty water.
Spinnerbaits are an underrated riprap lure type, but when the water’s dingy to dirty, they’re hard to beat. Long casts and relatively slow retrieves that allow the lure to occasionally bump the rocks are typically best.
Choose your blade types based on water temperature and retrieve speed. If it’s cold and you have to go slow, double Colorados are best. If you can get away with a faster retrieve, you’ll want less “lift” from the blades, so go with double willowleafs. As for colors, it’s tough to beat white or chartreuse-and-white.
Finally, there’s the jig. The best style for riprap is a football swing-head jig—the kind where the hook is free to move around and is connected to the head by a loop of wire or a split ring.
Why the football swing-head jig? It avoids hang-ups better than other jig types, which are notorious for getting in the crevices of riprap and never being seen again. Thread a Gene Larew Biffle Bug or other soft craw onto the hook and crank the lure steadily—just slow enough to maintain bottom contact.
Where should you throw it? At the base of every riprap wall are a few rocks that rolled farther down the embankment than the others. These isolated rocks hold fish, and a jig is great way to target them, especially if they’re deeper than your crankbaits can reach.
RINSE, REPEAT—BUT DIFFERENT
If there’s one secret to riprap fishing, it’s this: One pass along a riprap bank is not enough, and you should be systematic about your approach and presentation. First, you should consider sticking with one bait or bait type when making that first pass down a riprap wall. Experiment with retrieves and colors but stay with one lure type. If you had any success on your first pass, make a 180-degree turn and go back over the same water in the opposite direction with a different bait type.
There are lots of different lure types that will catch bass on riprap, but there’s usually one that’s best on any given day in the given conditions. Likewise, there’s also going to be a best direction to present that lure. Typically, the best direction will be determined by any current that’s present. If there’s no current, the best direction might depend on the angle of the sun. The point is, you’ll only be able to figure all this out by being systematic and experimenting until you get dialed in.
Do you need a lot of sophisticated electronics to fish riprap successfully? Absolutely not. But good sonar can help you identify key spots in the riprap that other anglers miss. For that, both downscan and sidescan capabilities are useful.
Traditional downward-looking sonar is all you need to spot isolated rocks that slid down the incline a little farther than the rest. Remember that these rocks were unceremoniously dumped from a higher elevation. Most settled pretty quickly along the slope, but some kept rolling. Sonar can help you find them.
Sidescan is just the ticket for looking at the riprap as you parallel the bank. It can show you the small depressions or projections that you can’t see from above the water. It will also reveal any submerged brush or debris that got wedged in the rocks. When you’re looking at yards or even miles of sameness, a little variation is magnified and can mean a lot. If you see something different, by all means cast to it.
But what if you don’t have sonar? No problem. You’ll just need to make a little extra effort. The next time your body of water experiences a drawdown or any low-water period, get out there—by boat or car—and look at the riprap. Take pictures or use a GPS unit to mark anything out of the ordinary like brush, unusually large rocks, subtle points or indentations. Mark whatever’s different and come back to fish it when the water’s up again. You can use Google Earth Pro’s historical imagery feature to do much the same thing, but you’ll see more detail if you do it in person.
魚探がなければダメなのでしょうか? いいえ問題ありません。ちょっとした手間をかければ大丈夫です。もしいつかそのフィールドが減水したり水不足になったときに、ボートや車でそこまで行って、リップラップを見てください。写真を撮ったり、GPSを使用して、オダ、異常に大きな岩、微妙な張り出しやくぼみなど、通常とは異なるものをマークします。何が違うかを覚えておいて、水位が回復したらそこへ釣りに行きます。 Google Earthを使えば同じようなことができますが、実際に行くほうが間違いないでしょう。