Somewhat shallow areas close to deep-water access and relatively sunnier days are the keys. This is a roundabout way of saying winter smallmouth bass want to gobble a meal close to their deep-water winter haunts and are more likely to feed up into the early afternoon when sunlight penetration is highest.
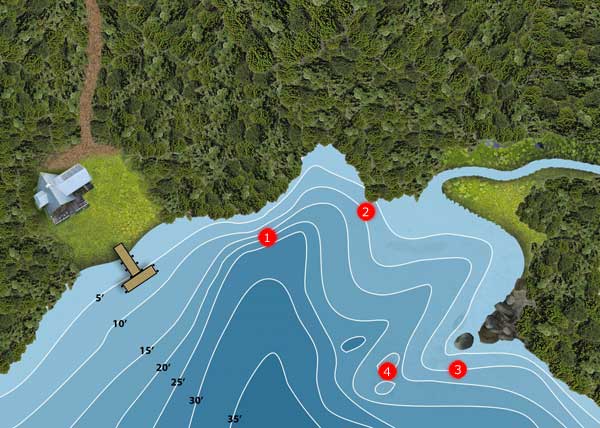
Areas of emphasis should be main-lake structure-oriented: points, ledges, and humps adjacent to the deepest water. This is where good mapping software, preferably with depth shading, comes into play because abrupt changes are the places to start looking for winter bronzes. Find the deepest flats and then pick out the closest and sharpest break. Secondary features like nearby ditches or ancillary points are bonuses since depressions and bottom compositional changes are more likely to attract forage species like yellow perch, bluegills, and crawfish.
1. Ledges
2. Points
3. Rocky Areas
4. Humps close to deep water
That’s the macro overlay, but the micro magic is all about fine detail. The best areas have a combination of these things – bait, rock, and what residual grass is left over from the fall. The juiciest niche of all: shell beds. These freshwater filter-feeder rest stops on the hard bottom are a haven for the microorganisms from which the rest of the food chain is built. If you’re dredging up mussels on the occasional cast, you’re in the right place (but remember to retie because mussel shells can cleave fluoro and braided lines).
To dial in on the minutia, it’s a choice between old school and new school. Modern electronics like down- and side-imaging sonar are hard to beat for identifying bottom composition changes and eliminating dead water, but there’s also no replacement for learning a spot like the back of your hand by dragging or dredging. By sliding a 3/4- to 1-ounce Carolina rig or football jig across the bottom, you’ll know exactly where gravel turns to chunk rock to weedbed, and vice-versa. Dredging the sharp sides of a main lake point with a deep-diving plug is also a nice complement to standard sonar since the dull (mud), thumping (timber) or crunching (gravel) feedback up your line will reveal any brush or grass patches (on your trebles) that reside off the edge only loosely defined on a standard-issue 2-D unit. Chucking and winding a large deep-diver also doubles as a way to warm up your hands and core while covering ground to find more productive water.
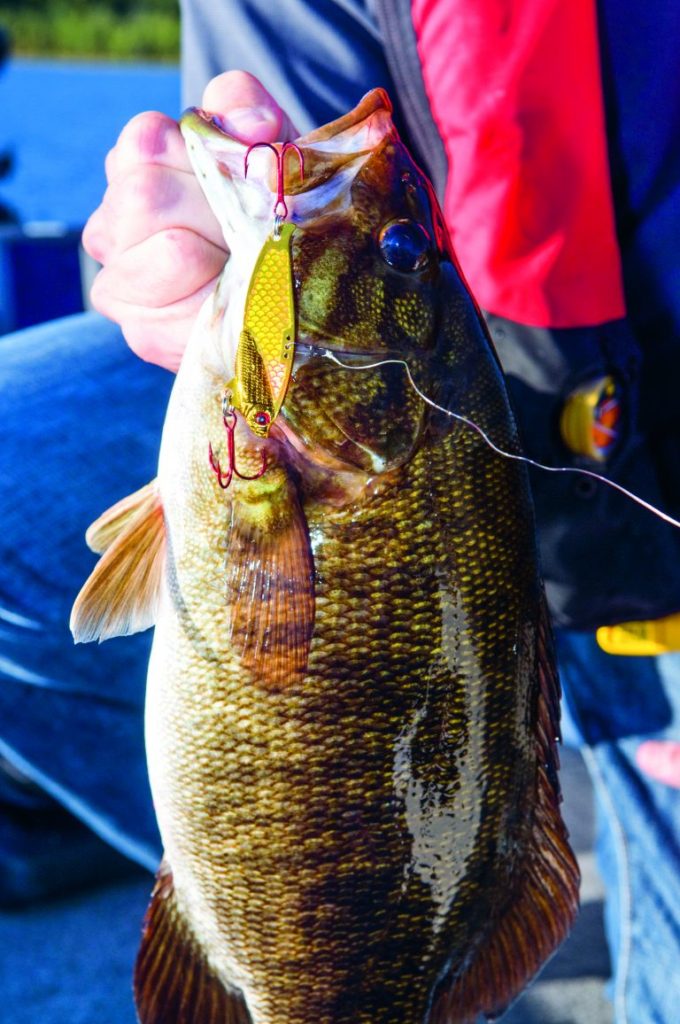
Once you’ve established some prime wintertime real estate and are ready to seduce the resident smallies, few presentations have proven as effective as the staccato sit-and-lift retrieve of a blade bait. Emphasis on the sit. For the uninitiated, the most critical takeaway is the pace of play: the best retrieves are slow, slower, and the “dead-flip.” The fish you are targeting are lethargic to semi-dormant cold-blooded predators eating lethargic to semi-dormant or dying forage species. In other words, the strike zone is small and the energy a wintertime bass is willing to use to chase a fast-moving prey is extraordinarily low.
In my experience, a better-than-average blade presentation starts with a long cast beyond the target area. Once the reel handle is engaged, the rod tip stays high and your eyes become your most valuable tool – and this is where a hi-visibility braid to fluorocarbon leader combo shines. Watch for the moment the bow in the line goes from slack to semi-tight as the bait contacts bottom. It’s very rare for a lure to be taken on the initial fall, but it’s better to be prepared than miss out.
A slow retrieve dictates a 7- to 10-second pause on the bottom and then a subtle lift with the rod tip. The lift is where the money gets made. It’s not a jig hop or a spoon jack – it’s a controlled movement of the rod tip from 10 to 11 o’clock – just enough lift to get the blade to engage and shimmy 3 to 4 times within a foot of the bottom.
That’s it. When you lift the bait, you want its transmission to barely register up your line, like the pulse of a cell phone through the six layers you’re wearing. The second you feel it, kill it and let gravity take its course.
A slower retrieve means letting the metal marinate among shells and sand grass longer than 20 seconds at a time. As you repeat these micro gyrations and alluring pauses, combat monotony by visualizing your bait being studied by a skeptical predator, and then as you flick it off the substrate, picture it just peeking out from between a rocky crevice and running headlong into a gang of smallmouths. For those who need clarification for presentation pace, my best guess to emulate a temperature stressed perch or minnow flitting around shelter.
The “dead-flip” is the last-ditch (and perhaps most infuriating but rewarding) retrieve option. Unlike the other approaches, your cast should land directly over the intended target area. Let the bait free-spool, flashing erratically to bottom, imitating a recently departed prey item. Allow ample slack so that when the lure hits bottom, it lies lifeless, flat on one side of the blade. After a healthy soak, impart a minimal amount of energy to pick it back up on edge then lay it back down on the opposite side. (Imagine you’re trying to flip the world’s smallest pancake and you’ve got it.) Do this as long as you can stand before boat movement or boredom takes your bait out of the strike zone. Whether it’s the fatal flickering action on the way down or the death flops that suggest a defenseless meal, something about this act draws big, lazy smallmouths.
A “winter strike” is an oxymoron because a smallie biting a blade bait is about as mushy-feeling as stepping in yellow snow. Nearly all of the time, as you start to lift up on the bait, it will just feel a little strange before the line starts drifting off to one side. In a more active feeding window, you may feel the ‘tick’ of the blade when it hits the inside of the fish’s mouth after being slurped off the bottom. In either case, fight the temptation to deliver a finishing blow on the hookset. A “reel-set” and steady pressure with a bowed-over rod is advisable since the fish may have only one or two barbs of a treble at the corner of its mouth after picking up the bait. It’s also common to pull the bait away from a light biter, only to find his friend on the next fall, so fight the urge to reel in slack if you lose contact on the first nibble.
Equipment-wise, any 7-foot, medium-fast action outfit will handle the task, with the crucial details being sensitivity and a forgiving tip section to keep lighter-wire trebles buried. Most wintertime blade vets prefer the light-braid-handling capabilities of spinning tackle, but I’ve had just as much action on a finesse baitcasting setup. For line, I prefer a braid-to-leader system consisting of 10- to 15-pound main line with a longer-than-average 15-foot tag end of 8-pound-test fluorocarbon, though straight fluoro or a short mono leader may be as effective. The confidence in knowing my offering is vibrating like it should and that I’m not dragging a connection knot in front of fish makes the choice worthwhile for me.
On the business end of the setup is your humble slab of aluminum and lead. While there are limitless commercial and DIY options, I use forward-weighted blades with the thinnest-gauge metal body. Since the thickness is directly correlated to vibration (thinner = tighter flutter), the rationale is similar to why flat-sided crankbaits outperform in cold-water conditions. As for weight, I tend to flip the typical advice for finesse fishing on its head. When the water is coldest and fish are least active, go heavier and slower. My standard weight is ½ to ¾ ounce, ranging to ¼ ounce when fish are active and suspending off the bottom. For the pointy bits, short-shank EWG trebles get my vote as they’re less prone to grabbing cover and fouling line on the fall. One “hack” to consider is snipping the forward barb on the front treble to limit baits lost to brush piles and stumps. Color-wise, it’s remarkable how well an unpainted model produces, but gold and silver variations won’t lead you astray.