「キャロライナリグの仕掛け方と使い方」釣りの基本から実践まで丁寧に解説

キャロリナリグとはシンカーを使ってワームをボトム底まで沈める人気の釣り方です。この記事では、キャロライナリグの作り方の手順から、いつどんな場所で使うのが効果的か、実際の使い方までを詳しく解説しています。バス釣りを始めたばかりの初心者さんから上級者まで、このリグを完全に理解できる内容です!
こんにちは!店長の小山です!
みなさんはキャロライナリグをよく使いますでしょうか。
キャロライナリグは、ライトキャロライナリグ(ライトキャロ)からヘビーキャロライナリグ(ヘビキャロ)という感じで、使うシンカーの重さで細分化されているリグですよね。
キャロライナリグは他のリグに比べて構造がやや複雑で、リグるのが面倒臭いという声をよく聞きます。
私もそう思います。
しかし、そんな面倒臭いリグが、何十年もなくならずに今も使われている理由は何でしょうか。
答えはひとつ。よく釣れるからですよね。
私がよく行く野尻湖や木崎湖でも、ライトキャロがスモールマウスバス狙いの定番リグとして活躍している、よく釣れるリグです。
釣りには面倒臭いことばかりなのに、釣り人にはなぜか面倒臭がりな方が多いのがふしぎなのですが笑、本当にリグるのが面倒臭いこのリグを、本当にリグるのが面倒臭いという理由で使わないのは確実に損をしていると私は思います!
この記事は、アメリカのアウトドア専門ウェブマガジン「field and stream」の記事で、ライターのシェイ・ベイカー氏が、キャロライナリグの基本について解説しています。
バス釣り初心者さんはもちろん、上級者さんでも復習の意味でぜひ最後まで読んでみてください。
きっとバス釣りがさらに上手になります!
キャロライナリグとはどういうものか?
What Is a Carolina Rig?
In the most basic terms, a Carolina rig consists of a weight, a bead, a swivel, leader, hook, and soft-plastic lure, and the rig is designed to run deep in order to target bass along the bottom of a fishery. The weight gets the lure the bottom, and the swivel and leader keep it separated from and trailing the weight as you retrieve the rig. When you rig it right and cast it out, the result is a tantalizing worm or creature bait bouncing along the bottom, right where the fish are.
How to Rig a Carolina Rig, Step by Step
Use the steps below and the video above to create perfect Carolina rigs.
Step 1: Slide the weight onto your mainline. Bullet weights, egg weights, or barrel weights are best for Carolina rigging, and the amount of weight you use should vary based on the depth you’re fishing. You can go as light as a 1/4-ounce if you’re fishing in 2 feet of water, for example, or as heavy as a full ounce in 25 feet or more. If you can’t feel the bottom, go a little heavier; if you’re constantly getting hung up, go a little lighter.
Step 2: Slide a bead onto the mainline below the weight. The bead does two things: it creates a little rattle as it bumps into the weight, and it protects the knot you’re about to tie.
Step 3: Tie one end of a swivel to your mainline.
Step 4: Tie a short leader to the other end of the swivel. For your leader, you’ll want to use either monofilament or fluorocarbon line. The length can vary, but typically somewhere in the 2- to 3- foot range works best.
Step 5: Tie on the hook. Extra Wide Gap (EWG) and basic offset-shank worm hooks work well with Carolina rigs. For thin baits, like finesse worms, the offset worm hook is the way to go. If you’re using a thicker bait, like a grub or creature bait, then an EWG hook works better.
Step 6: Rig a soft-plastic bait to the hook. Insert the hook point into the nose of the soft-plastic bait about a 1/2 to 3/4 of an inch and then run the point out of the bottom. Put a little bend in the bait, and then run the hook back through the plastic so that the bait lays straight. (See the video.)
When and Where to Use a Carolina Rig
As mentioned, you can catch bass on a Carolina rig year round, but it tends to work best as the bass finish spawning in the spring and the water starts to warm. The fish begin to move off shore and into deeper waters in this early-summer time frame. As they make their way out into 10 feet of water and more and group up on flat points and ledges, a Carolina rig gives the angler the perfect tool to get a bait down to the bottom, where the fish are—and keep it there. And although a Carolina rig will work in stained to muddy water, it excels in clear-water situations.
How to Catch Loads of Bass with This Classic Rig
You’ll want to make long casts with a Carolina rig, and then make repetitive, slow, drags across the bottom. The goal is for the weight to maintain bottom contact. As a Carolina rig is drug along, it creates a muddy water trail as the weight stirs up silt off the bottom.
Then, a few feet behind the weight, there’s your soft plastic lure trailing behind. The bass are drawn in by the sound of the weight and bead clicking along the bottom and by the silt trail. And when they get close, they find your lure swimming along and slurp it up.
The bite on a Carolina rig can be hard to distinguish, especially when using a heavy weight. You won’t actually feel a bite, per se, like the thump you’d feel fishing a jig or shaky-head, for instance. Rather, you’ll feel your rig get mushy, as the fish picks the weight up off the bottom.
When you do feel this, you need to reel down and make a sweeping hook-set to the side. The bite often comes when you have a lot of line out or a bow in your line underwater. This sweeping hookset helps ensure a good hookup. Then all that’s left to do is haul your fish aboard.
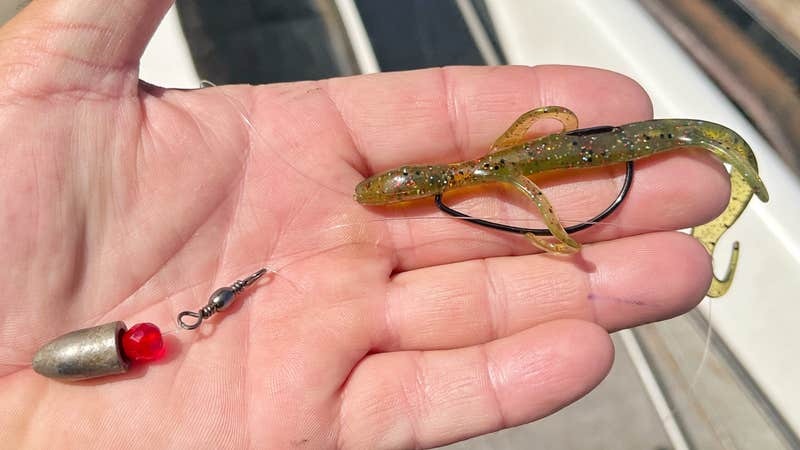
基本的キャロライナリグとは、シンカー、ビーズ、スイベル、リーダー、フック、ワームで構成されており、フィールドのボトムでバスを狙うために設計されています。シンカーがワームをボトムまで沈め、スイベルとリーダーがズル引いたときにシンカーから離れた状態を保ちます。うまくキャストして操作することで、ボトムにいるバスを誘惑する魅力的なアクションを造り出せます。
キャロライナリグを作る手順【ステップ バイ ステップ】
次の手順を参考に、完璧なキャロライナリグを作れるようにしていきましょう。
ステップ1:メインラインにシンカーを通します。
キャロライナリグにはバレットシンカー、ラウンドシンカー、タル型シンカーを使うのがベストで、釣りをする水深に合わせて重さを変えます。水深60センチなら1/4オンスといった軽いものを、7メートル以上のディープなら1オンス近くの重いものを使うといったように調整するのがよいでしょう。ボトムが感じられない場合は重めにし、すぐに根掛かりしてしまうようならば軽めのシンカーを選びましょう。
ステップ2:シンカーの下にビーズを通します。
ビーズには2つの役割があり、1つはシンカーとぶつかって少しの音を立てること、もう1つは結び目を保護することです。
ステップ3:メインラインとスイベルを結びます。
ステップ4:スイベルのもう片方にリーダーを結びます。
リーダーにはナイロンラインかフロロカーボンラインを使い、長さは60~90センチくらいが最適でしょう。
ステップ5:フックを結びます。
キャロライナリグにはワイドゲイプ(EWG)フックや基本的なオフセットフックがよく使われます。細いワームなら狭いオフセットワームフック、太いグラブやクリーチャーワームならワイドゲイプフックがおすすめです。
ステップ6:ワームをフックにセットします。
ワームの先端からわずかにフックを差したらフックの先端を下側から出し、ひっくり返してもう一度まっすぐになるようにワームに通します。
キャロライナリグはいつどんな場所で使うべきか
キャロライナリグは年間を通して使えますが、バスが産卵を終えて水温が上がり始める春先から初夏にかけて特に効果的です。
この時期、バスは沖の方に移動し、3メートル以上の深場の平らな岬や段差に群がる傾向にあります。キャロライナリグならワームをしっかりとボトムまで沈め、バスがいる場所に届けられます。キャロライナリグは濁りがあっても有効ですが、クリアウォーターに適していると言えるでしょう。
歴代の人気記事


この伝統あるリグでバスをたくさん釣る方法
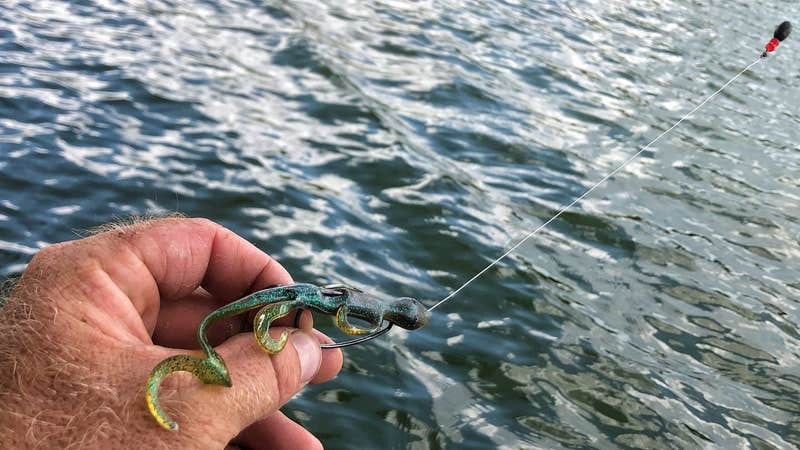
キャロライナリグは遠投し、そのあとボトムをゆっくりとズル引きするのを繰り返すのが基本です。シンカーがずっとボトムに付いている状態を保つのがコツです。ズル引きしたとき、シンカーが底の泥を巻き上げることで濁りが発生し、水中を何かが通った跡を残せます。
そしてその数十センチ後ろにワームが付いてくるわけです。バスはシンカーとビーズの音や濁り跡に引き寄せられ、近くまで来るとワームを発見することになります。
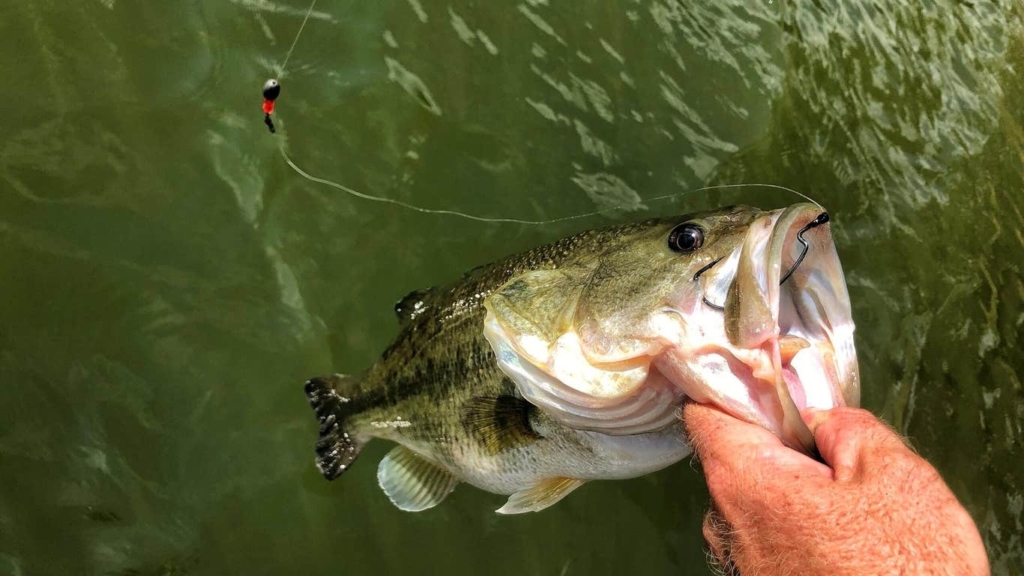
キャロライナリグのアタリは重いシンカーを使っているとわかりにくいことがありますが、実際はアタリを感じるというよりは、リグがぼわっとした感触に変わるのを手がかりにしましょう。それはバスがシンカーを底から持ち上げている合図です。
そういう感触を感じたらたるんだラインを巻き取って張り、横方向に大きくフッキングするのがコツです。バイトはラインがたるんでいる状態で来るので、この方法でフッキングすることで確実にフックセットできます。あとはバスをランディングするだけです。
英語の翻訳ですので感覚的な部分を表現するのが難しいのですが(わかりにくくてすみません)、本文にあった「リグがぼわっとした感触になるバイト」の部分を私なりに補足させていただきます。
記事にあった通り、キャロライナリグは遠投して使いたいものです。遠投した先でバイトがあると、なかなかダイレクトな感触として伝わりにくいことがひとつ。
もうひとつは、シンカーまではラインをピンと張っていても、ワームは常にノーシンカー状態でふわふわしていますので、バスが食った感触が分かりにくいことがあります。
このふたつの理由で、ガツンという明確なバイトがでるよりは、ヌーンとした違和感を感じることの方が多くなると思います。
野尻湖でも、ズル引きしてボトムのごつごつした感触がなくなったと思ったらバスが食ってた、なんていうことはしょっちゅうです笑
また、ライトキャロはリーダーを長くすればするほどかなりキャストしにくくなりますが、スペースがあればたらしの長さ(ロッドティップからシンカーまでの長さ)を長くして、ゆったりとバックキャストをとって「ブッッ、ワーン」という感じで投げるとうまくいくかと思います。
リグるところからキャストまで面倒臭いことだらけなリグかもしれませんが、釣れるのには理由があることが分かりました。
キャロはなんとなく使ってこなかったという方は、ぜひ使ってみてくださいね!
それではまた。
毎度ありがとうございます!